Whether you want to capture the highlights during intense gaming, record meetings and online classes in full screen without missing any details, or quickly take screenshots to grab information while browsing web pages daily, LosslessRec, this professional screen recording software, can meet all your needs. It supports the output of commonly used formats such as mp4, mp3, and wav, with a maximum frame rate of 120fps, providing ultra-high-definition and ultra-smooth picture and sound quality, helping you record easily anytime and anywhere.
First: Click the following button to free download LosslessRec setup file, and > Install
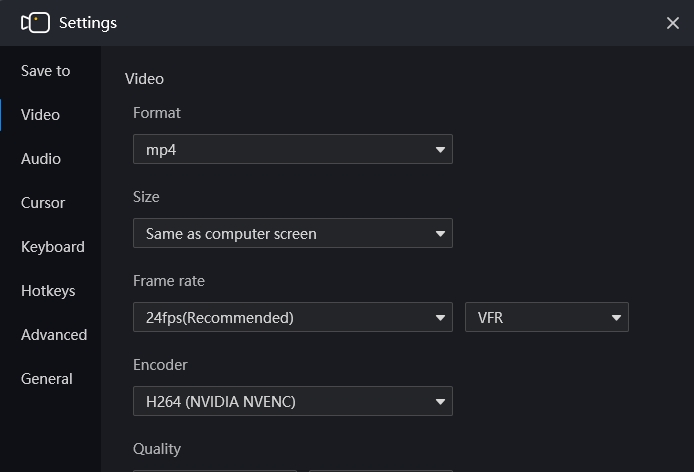
Settings on video or audio parameters matter a lot on the recording quality. Here let's have an overview of what parameter options LosslessRec has offered and how to set video/audio parameters properly.
Go to Settings, and choose Video/Audio. You can see all the parameters that can be modified about audio and video.
Questions You May Ask
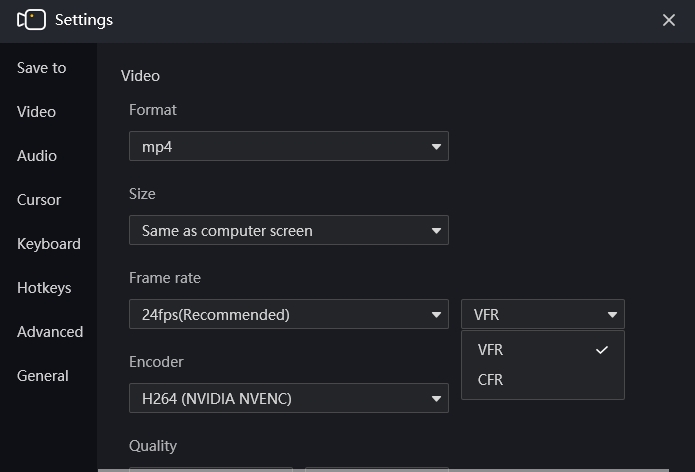
1CFR or VFR, what's the difference, which one to choose?
Constant frame rate and variable frame rate are two FPS standards. As the name suggests, the former one keeps a fixed frame rate value when recording while the latter one obtains an actively changeable fps value according to the real-time screen movement.
VFR is widely used in mobile film shooting, (live) streaming video encoding, and many more for outputting a relatively smaller-sized video. But it's not compatible well with video editing software like Adobe Premiere Pro, more likely to cause video and audio out of sync or other issues. So many people choose CFR recording for post-production or record VFR first and then convert VFR to CFR before the editing.
Another note on CFR is that sometimes even when you select one certain fps value say “30” FPS with CFR option, it's still possible for you to get a VFR video due to the incompetent computer or encoder.
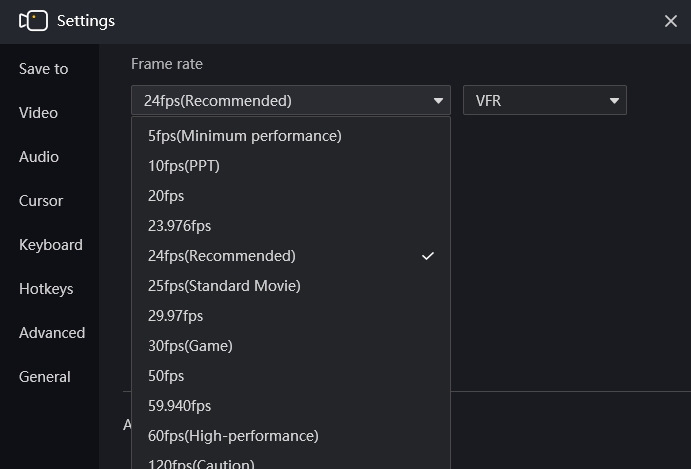
2How to choose an appropriate frame rate Value?
Let's take a look at some fps standards first: NTSC color encoding system that's popular in the US and Japan adopts 30fps as its standard, and PAL in UK, Australia, and more countries delivers a frame rate of 25 fps. All general TV shows and movies are created and viewed at 24fps. That's to say, choose any fps value between 24 and 30 is totally enough for a high-quality recording. If you want to lower the file size, you can lower it to 20.
Then why there's 60fps option? Generally, under the following two circumstances can you pick 60fps as the target frame rate:
You plan to record a high-powered PC game that's played in 60 or higher fps.
You want to make a slow-motion video after the capture. If the original fps is too low, the slowed video will look laggy.
3What's the bit rate of each quality option?
We all know that video quality is decided by many factors including video parameters and the recording environment. And bit rate is de facto one of the key parameters influencing the quality (where you can set from Settings>> Video>> Resolution on Windows). Currently, only Windows users can use adjust the exact bit rate values.
How to Set Saving Folder for Recording
Have you ever been troubled by the problem to find out the recorded file? An organized storage habit will help you settle the puzzle and you can do so with LosslessRec. So this post will give you ways to set saving folder for recording.
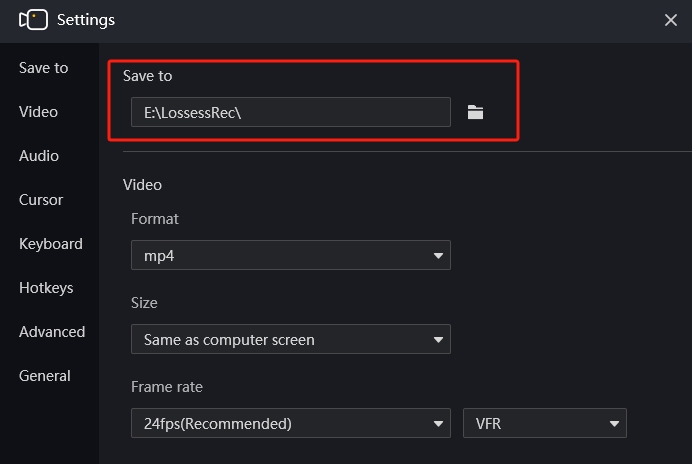
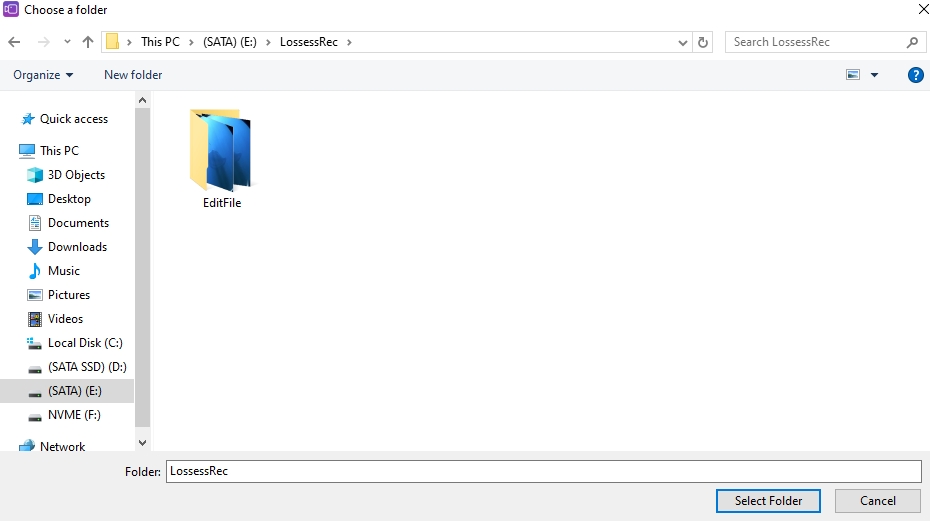
Step1Enter the Settings interface directly from the main interface and click the General menu. The recordings are saved in the E:\LosslessRec recording folder by default.
Step2Click Destination folder to set new folder for recording and name the folder for better reference.
Step3After selecting a recording mode and setting the relevant parameters, press REC or use Alt+1 as an alternative to start recording. During recording, there is a timer and annotation function for you to use. When all operations are completed, you can stop the task manually.
After the recording is completed, you can see the content you just recorded in the list on the main interface, or directly enter the save directory you just set to find the recording record
How to Set Hotkeys for Recording
You can set hotkeys to invoke the recording program with LosslessRec. If you don’t want to switch between several windows over and over again, then using hotkeys is an excellent way to command the software to perform the recording action. Now let’s go to the subject of how to set hotkeys both on Windows.
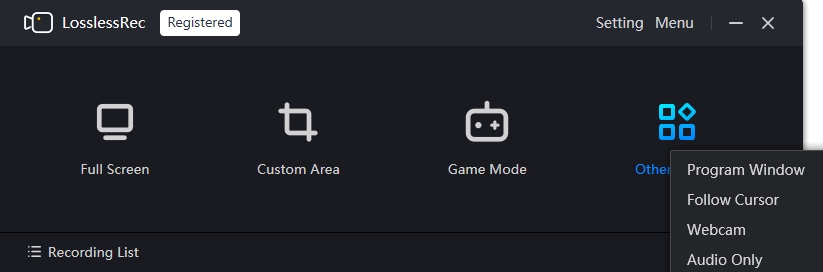
Step1Turn on LosslessRec and choose one mode.
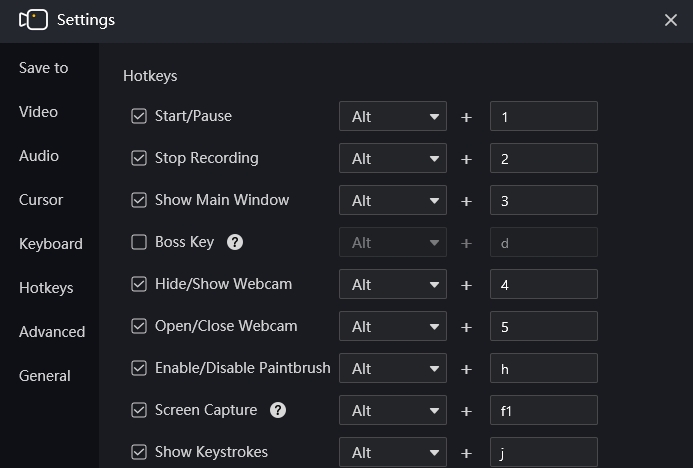
Step2Please move to Settings icon and switch to Hotkeys interface, The default settings of hotkeys for Windows are:
Start/ Pause: Alt+1
End recording: Alt+2
Show main window: Alt+3
Boss Key: Alt+d
Hide/ Show webcam: Alt+4
Open/Close Webcam: Alt+5
Enable/Disable Paintbrush: Alt+h
Screen Capture: Alt+f1
Show Keystrokes: Alt+j
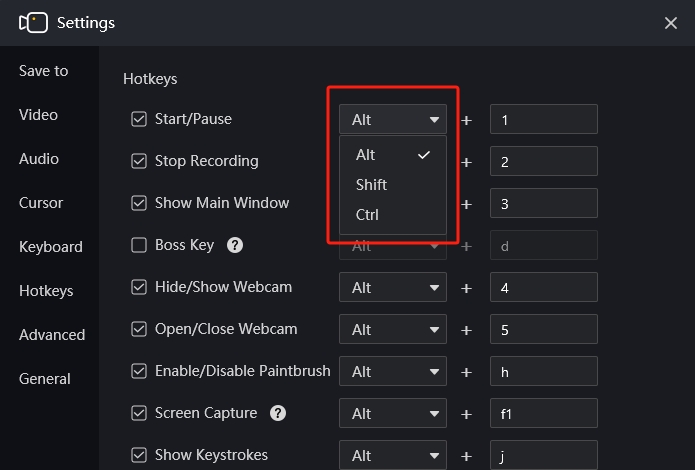
Step3Change default hotkeys
The LosslessRec Windows version offers many combinations. You can change among Alt/ Shift/ Control with numbers 0-9. Be careful to check the settings because the same hotkeys settings can’t run simultaneously.
Now you can employ hotkeys to bring convenience to your recording.
How to Add Watermark to Recording on Windows
Short video increases dramatically in recent years and many people even make a living through creating short videos. At the same time, sharing videos on social platforms like YouTube, and TikTok becomes a new fashion among the public. To let video viewers know the creator of the content to boost popularity or protect your video from being copied by someone else, you are suggested to add watermark to recording.
LosslessRec supports the addition of watermarks by setting it before video recording. And the whole process is very simple and quick. Read on to know how to add watermark to recording. LosslessRec supports adding watermarks in types of texts, images, and timestamps.
Step1Go to Settings
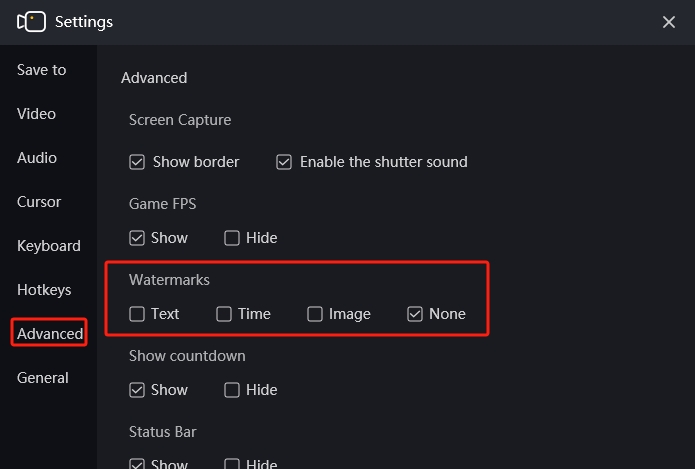
To add watermarks automatically to any of your future video recordings, you need to set them in advance. You can go to Settings >> Advanced, and find the Watermark section.
Step2Settings to add watermark to recording
There are three forms of watermarks in LosslessRec, Text watermark, Timestamp watermark, and Image watermark. By ticking the related checkbox, you can enable it and show the detailed settings.
How to add text watermarks?
Text watermarks are used in videos to protect the copyright and ownership of the content. By adding a text watermark to a video, you can identify your ownership, discourage piracy, and use it as evidence in legal proceedings if necessary. And you can also add your website link, or other promotional or interesting texts to make your video unique.
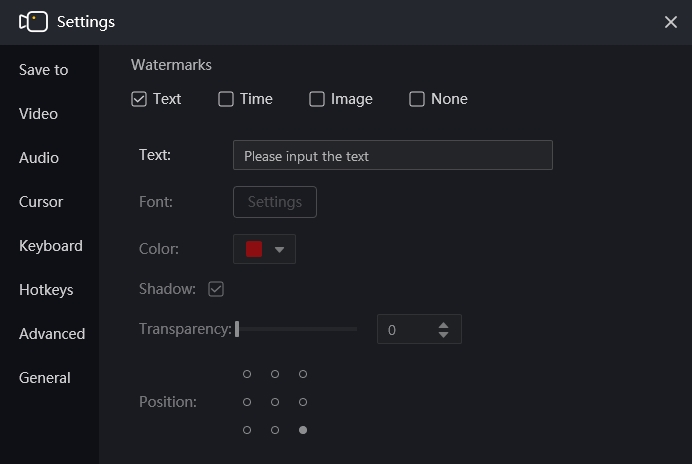
By choosing the Text option, you will enable the text watermark settings. And then, you can type in the text you hope to show in the whole video and set the font, color, shadow, transparency, and position for the text watermark.
Text: Add any wanted words to be used as a watermark.
Font: Change the text font type, style, and size to meet your needs.
Color: There are basic colors and custom color choices for you to choose from.
Transparency: Set the transparency parameter from 0 to 100. The higher parameter is, the more transparent the watermark will be.
Position: It offers 9 available positions for Watermark and you can apply at will.
After the settings, you can close the Settings window and start a recording to test whether the watermark works all right for you.
How to add timestamp watermarks?
Timestamp watermarks can be a valuable tool for adding context, verifying authenticity, keeping records, and providing evidence in legal proceedings. By adding a timestamp watermark to the video, viewers can see when the video was recorded, which can help to establish its credibility and provide important context to the content.
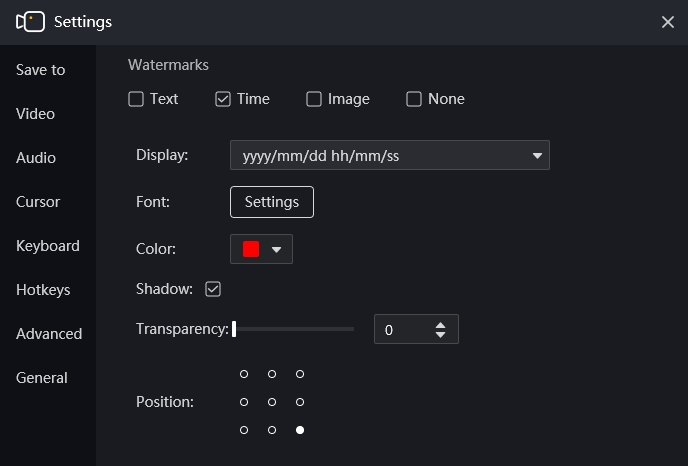
If you hope to add timestamps to your video recording, you can tick the Time option in LosslessRec and set the time watermark for your recording.
Display: Here you can choose the way you hope to show the timestamp.
Font: You can choose the font type, style, and size for the timestamp according to your need.
Color: You can choose the color you like among the basic colors and custom colors.
Transparency: You can set the transparency for the time watermark. You can choose from 0 to 100. The higher parameter is, the more transparent the watermark will be.
Position: It offers 9 available positions for the timestamp watermark for you to choose from.
When you finish setting the timestamp watermark, you can close the Settings window, and start the recording to test whether it meets your need.
How to add image watermarks?
Image watermarks are used in various contexts to protect the copyright or ownership of an image or video. It also helps personalize your videos if you are recording videos in a series. In LosslessRec, you can add image watermarks easily. And no matter whether the image is with transparency channels or not, you can set it in LosslessRec.
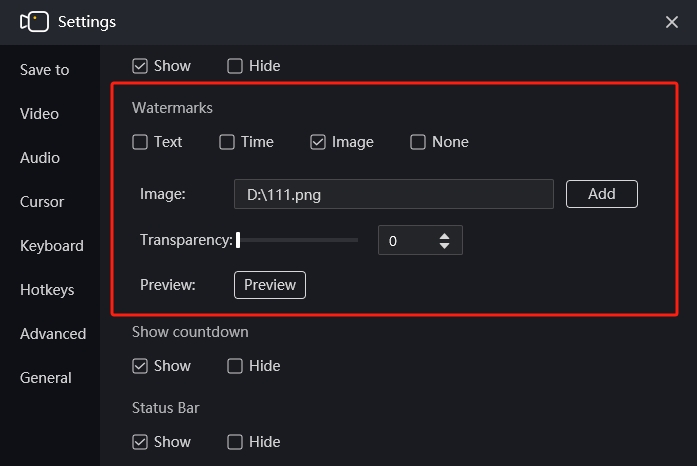
Image: You can add an image in PNG, JPG, or BMP format as the image watermark from the local storage.
Transparency: You can set the transparency from 0 to 100 so that the watermark will not cover your video content too much.
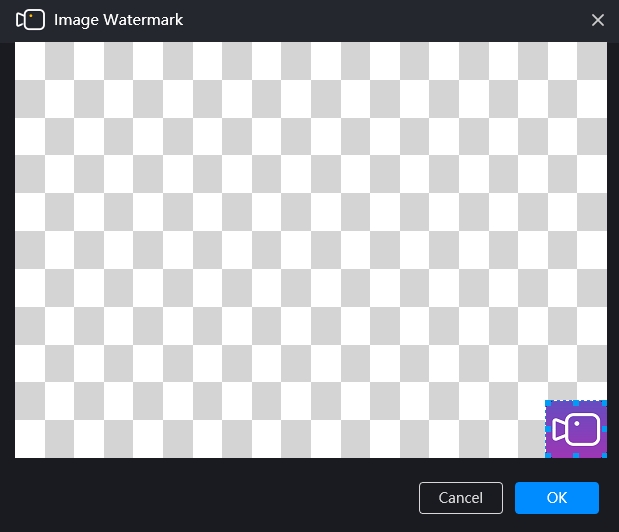
Preview: Pressing the Preview button, you can launch the window to show the position of the watermark. By dragging the middle of the image, you can set the position to show the watermark, and by dragging the edges, you can resize the watermark image.
Click the "Preview" button to preview and drag the icon position as shown in the image below.
And still, when you get everything ready on this window, you can close it and start a recording to check whether it works well for you. And the next time when you start a recording, the watermark will be added automatically.
How to disable the watermarks?
If you hope to disable the watermark in LosslessRec, you can go to Settings >> Advanced and tick None in the Watermark section. And then, you can close the settings window and start recording without watermarks.
In conclusion, watermarks are a valuable tool for protecting the copyright and ownership of video content, branding, verification, record-keeping, and providing context. By adding watermarks to the video, you can protect or personalize your content and brand, while viewers can verify the authenticity of the video and obtain important context. And with LosslessRec, you can easily add watermarks in types of text, images, and timestamps. With the steps in this article, you can add watermark to recording on Windows in clicks.
How to Enable & Set Mouse Cursor Effect for Recording
The mouse cursor effect is mostly applied in how-to tutorials, educational course videos, and other demonstration videos. The stress of important points can be shown by using cursor sound, track, or effects. In this way, viewers can easily grasp the key points and concentrate more on the content. As a professional screen recorder, LosslessRec also embeds this function. So the following part is about how to enable/ set mouse cursor effect during recording with LosslessRec.
Step1Choose the recording mode
To record the screen with mouse effect, you’d better capture with screen activity. Since the Webcam and Audio-only mode can’t enable the mouse effect, here we suggest the Full screen and Custom area to capture your screen video. As for Windows users, you can also select Game mode as well.
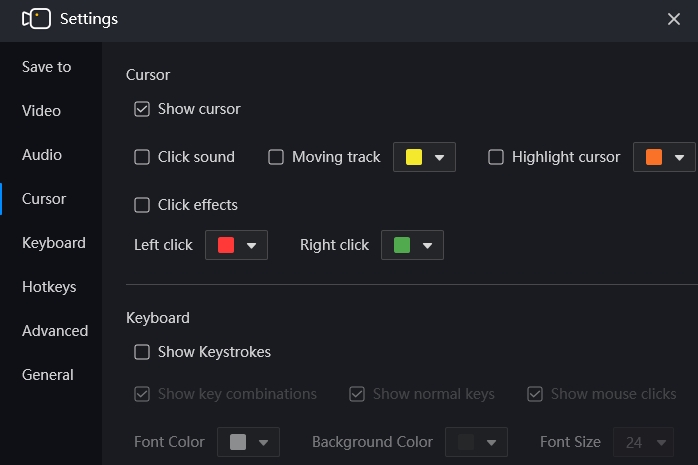
Step2Enable mouse effect
Go to Settings interface and then in the Cursor menu you can set mouse effect with ease. You are also allowed to change the default color as you like.
Step3Start Recording
Step3End Recording
Press the Stop button or Alt+2 to stop. If you need to edit and share a video, you can use the bundled editor to trim the recorded video.
Recording Task
This article is to show you detailed information about setting recording task and auto-recording. With the features introduced here, you can easily set LosslessRec to perform better for your need.
For example, the Segment section helps set to record and save videos in segments according to file size or duration as the recording goes on. This helps reduce the chance to lose data if there are recording or storage errors while recording.
While the auto recording feature helps set LosslessRec to start recording automatically at the software start-up (hidden or with the interface). And once working with the Automatically Start LosslessRec at the boot option, you can set it to record as soon as the computer starts.
And what’s more, with the scheduler, you can easily set LosslessRec to start or end a recording at a specific time. And this helps record the lectures, webinars, and online events when you don’t have time to stay with the computer.
Please find the detailed introductions below.
Where to find the Recording Task window?
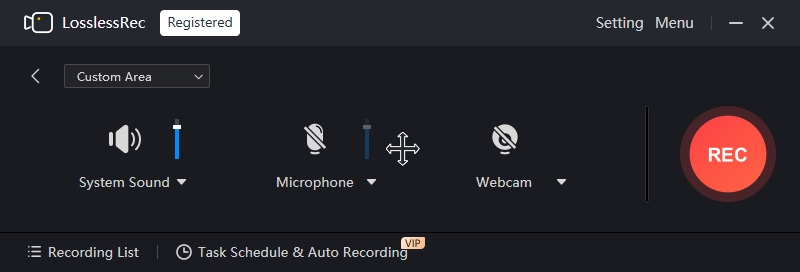
You can go to Menu >> Auto Recording to launch the Recording Task window.
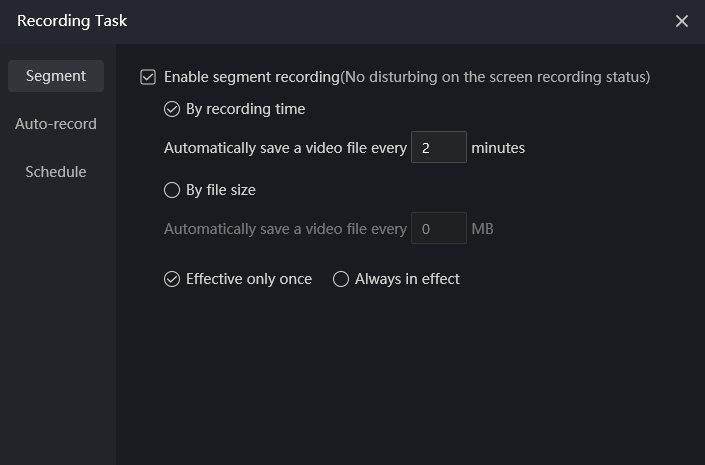
And there are three tabs on it, Segment, Auto Record, and Schedule.
Segment
Feature Introduction
This feature enables you to save the recorded files into segments as the recording is going on. You can set it to save separate files by file size or duration.
Common usage scenarios
While saving your recordings directly to a removable drive, you may need to control the size of each video file. For example, a FAT32 format hard drive only accepts files less than 4GB.
If you need to record online course series of a specified length, segmented recording is a great option. And as said above, you will also need the feature to avoid data loss due to recording errors during the recording since LosslessRec will save separate files as it’s recording.
After you choose a recording mode, you can go to Menu>> Auto Recording>> Segment>> Enable segment recording(No disturbing on the screen recording status). Then, you can choose "By recording time" and enter the time interval for segment recording, such as every 2 minutes. If you have a file size requirement, you can select "By file size" and enter the desired individual file size.
If you select "Effective only once", only the next recording will be saved in segments; if you select "Always in effect", each subsequent recording will be automatically saved as 2 minutes of video content.
Auto-record
The Auto-record feature is divided into two types: Auto-start recording and Auto-end recording.
Auto-start recording
Feature Introduction
Auto-record in full screen upon LosslessRec launch (hidden or with LosslessRec interface).
Common usage scenarios
You can set LosslessRec to start recording as soon as it’s started and no need to do the settings every time.
And what’s more, if you also set LosslessRec to start at boot, you can make it auto-record at the computer start. This will help you record automatically and save simultaneously as your computer usage record.
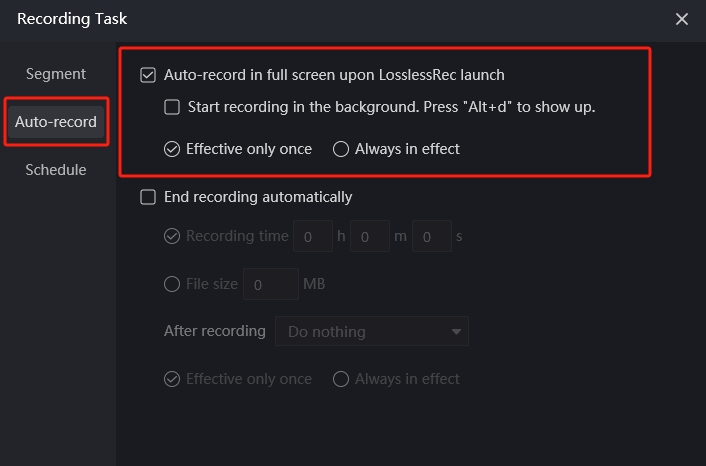
Go to Menu>> Auto Recording>> Auto-record, and then enable "Auto-record in full screen upon LosslessRec launch".
If you select "Start recording in the background. Press "Alt+d" to show up", the recording process will be performed hidden with no interface or icon shown on the screen. And if you hope to exit without a perception interface, you can use the boss key to show the main interface.
The default boss key shortcut is "Alt+d", and you can change it in "Settings">> "Hotkeys".
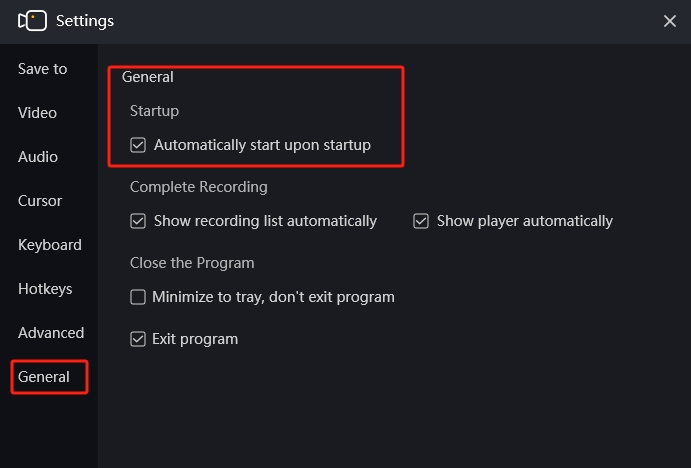
If you want to turn on the automatic recording at boot, you need to enable Automatically start the software at boot at the same time by going to Settings >> General >> Startup.
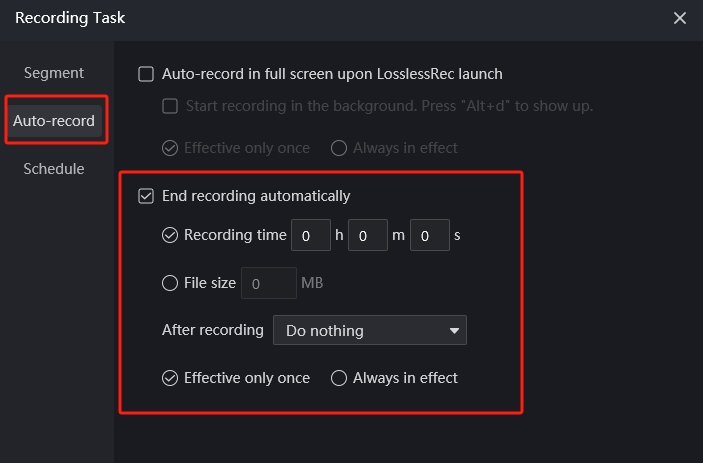
You can set the end time or full size of the auto recording here. It helps stop the recording automatically when the recorded file reaches the set length/size.
Common usage scenarios
If you already know the length of the video you want to record or have determined the maximum video size that can be uploaded, then this feature is perfect for you.
Go to Menu >> Auto Recording >> Auto-record >> choose "End recording automatically". And enter the duration of the timed end recording. For example, "01 h 00 m 00 s".
And then in the next recording, when the duration reaches 1 hour, the software will automatically stop recording the file and save the recorded 1-hour file.
Or you can input the size of the recorded file, for example, "100MB". And then the software will automatically stop recording and save the recorded file when the file size reaches 100MB in the next recording.
After the recording, you can set it to turn off the computer, or do nothing.
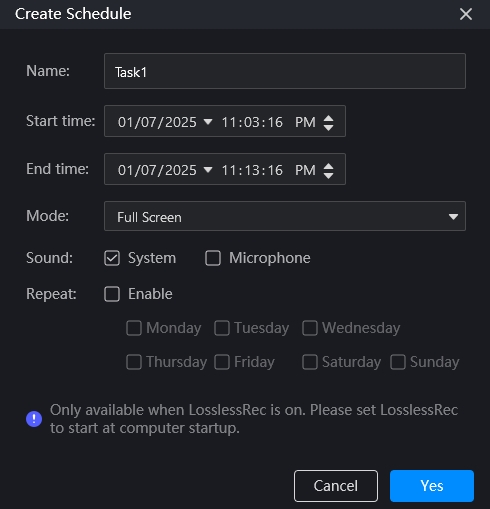
Schedule
Feature Introduction
This feature helps set recording tasks according to the start time and end time settings. You can also set the tasks to repeat by days.
Common usage scenarios
If you already know the start time and end time of a webinar or online course that you can’t attend, you can set up recording tasks in advance and watch back the videos when you are free.
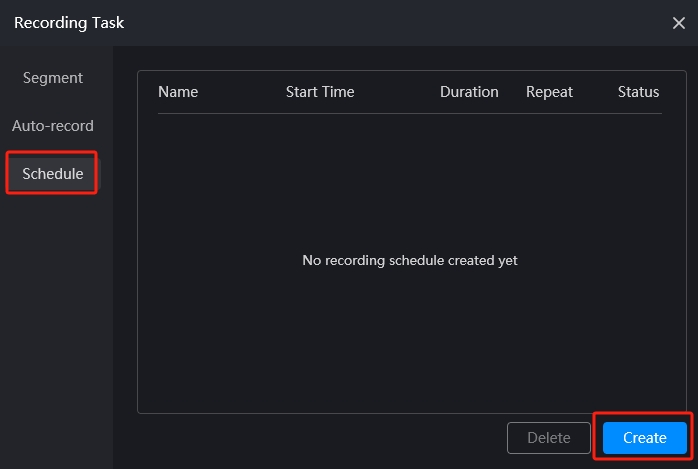
Go to Menu >> Auto Recording >> Schedule. Then, click on the blue Create button.
Enter the task name, set the start time and end time, and select the recording mode and audio source.
If you need to set up a recurring recording, check the Repeat time in the scheduled task creation screen.
After confirming, open the page you want to record, and keep LosslessRec on.
Tips
Schedule tasks can only be created and set when the software is not recording.
Segment recording can be set simultaneously with both Auto Record tasks and Scheduled tasks. For example, you can set an auto-end time of 2 hours in the Auto Record tab, and enable segment recording at the same time to save video files every 10 minutes.
Schedule tasks and Auto-Record cannot be set simultaneously since they will cause conflicts.